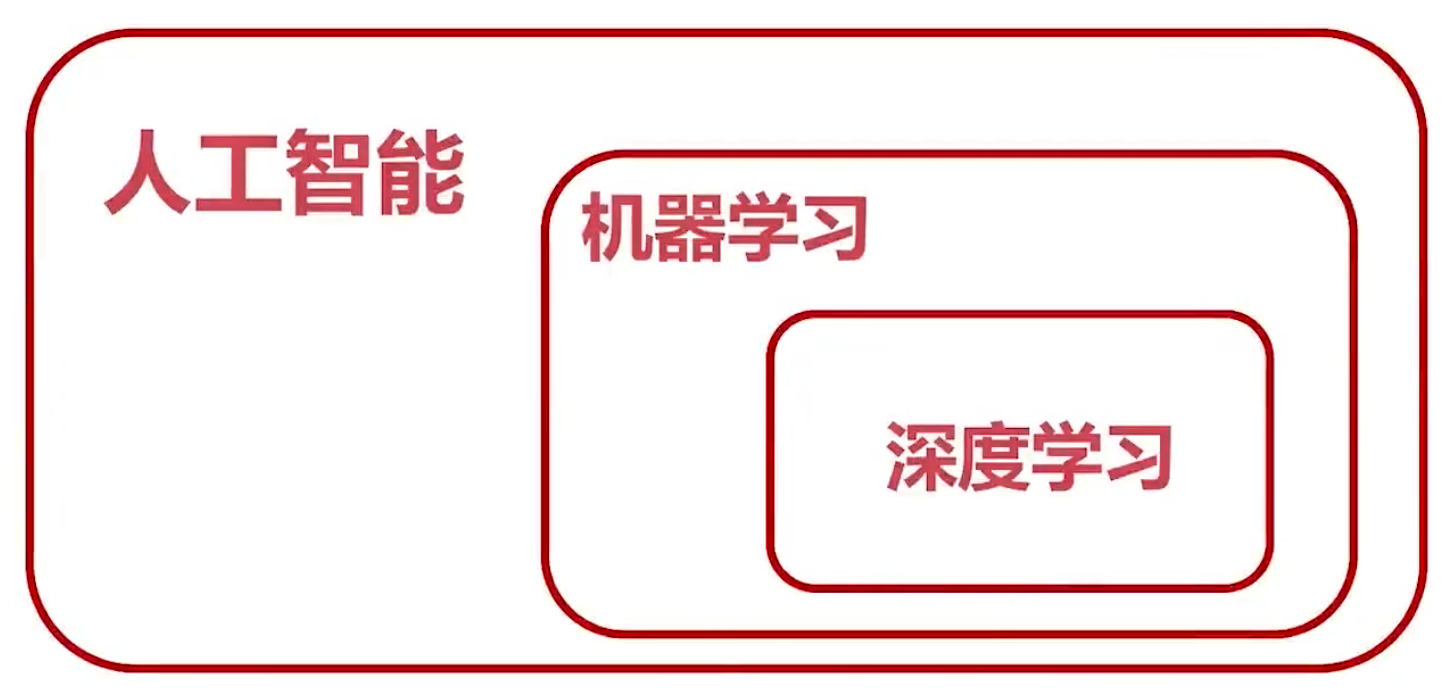
Skip to content

机器学习

  • 关系图
    Image title
    关系图,深度学习是机器学习的一种方法
  • 计算机视觉与机器学习的关系
    • 计算机视觉是机器学习的一种应用,而且是最有价值的应用。

Haar人脸、眼、鼻、口识别

  • OpenCV有两种识别方法
    • 哈尔(Haar)级联方法
      • Haar是专门为解决人脸识别而推出的
      • 在深度学习还不流行时,Haar已经可以商用
    • 深度学习方法(DNN)
  • Haar人脸识别步骤
    1. 创建Haar级联器
    2. 导入图片并将其灰度化
    3. 调用detectMultiScale方法进行人脸识别
      • API: detectMultiScale(img, double scaleFactor = 1.1, int minNeighbors = 3)
        1. img: 图像
        2. scaleFactor: 缩放因子
        3. minNeighbors: 最小的像素值
  • 图像识别

    import cv2
    import numpy as np
    
    #第一步,创建Haar级联器
    facer = cv2.CascadeClassifier('./haarcascades/haarcascade_frontalface_default.xml')
    eye = cv2.CascadeClassifier('./haarcascades/haarcascade_eye.xml')
    mouth = cv2.CascadeClassifier('./haarcascades/haarcascade_mcs_mouth.xml')
    nose = cv2.CascadeClassifier('./haarcascades/haarcascade_mcs_nose.xml')
    
    #第二步,导入人脸识别的图片并将其灰度化
    img = cv2.imread('p3.png')
    
    #第三步,进行人脸识别
    #[[x,y,w,h]]
    gray = cv2.cvtColor(img, cv2.COLOR_BGR2GRAY)
    
    #检测出的人脸上再检测眼睛
    faces = facer.detectMultiScale(gray, 1.1, 3)
    i = 0
    j = 0
    for (x,y,w,h) in faces:
        cv2.rectangle(img, (x, y), (x+w, y+h), (0, 0, 255), 2)
        roi_img = img[y:y+h, x:x+w]
        eyes = eye.detectMultiScale(roi_img, 1.1, 3)
        for (x,y,w,h) in eyes:
            cv2.rectangle(roi_img, (x, y), (x+w, y+h), (0, 255, 0), 2)
            roi_eye=roi_img[y:y+h, x:x+w]
            eyename = 'eye' + str(j)
            j = j+1 
            cv2.imshow(eyename, roi_eye)
    
        i = i+1
        winname = 'face' + str(i)
        cv2.imshow(winname, roi_img)
    
    
    # mouths = mouth.detectMultiScale(gray, 1.1, 3)
    # for (x,y,w,h) in mouths:
    #     cv2.rectangle(img, (x, y), (x+w, y+h), (255, 0, 0), 2)
    
    # noses = nose.detectMultiScale(gray, 1.1, 3)
    # for (x,y,w,h) in noses:
    #     cv2.rectangle(img, (x, y), (x+w, y+h), (255, 255, 0), 2)
    
    cv2.imshow('img', img)
    
    cv2.waitKey()
    

  • 视频识别

    import cv2
    import numpy as np
    
    #第一步,创建Haar级联器
    facer = cv2.CascadeClassifier('./haarcascades/haarcascade_frontalface_default.xml')
    eye = cv2.CascadeClassifier('./haarcascades/haarcascade_eye.xml')
    mouth = cv2.CascadeClassifier('./haarcascades/haarcascade_mcs_mouth.xml')
    nose = cv2.CascadeClassifier('./haarcascades/haarcascade_mcs_nose.xml')
    
    
    # 读取摄像头
    cap = cv2.VideoCapture(0)
    
    while True:
        # 从摄像头读取视频帧
        ret, img = cap.read()
    
        #第三步,进行人脸识别
        #[[x,y,w,h]]
        gray = cv2.cvtColor(img, cv2.COLOR_BGR2GRAY)
    
        #检测出的人脸上再检测眼睛
        faces = facer.detectMultiScale(gray, 1.1, 3)
        i = 0
        j = 0
        for (x,y,w,h) in faces:
            cv2.rectangle(img, (x, y), (x+w, y+h), (0, 0, 255), 2)
            roi_img = img[y:y+h, x:x+w]
            eyes = eye.detectMultiScale(roi_img, 1.1, 3)
            for (x,y,w,h) in eyes:
                cv2.rectangle(roi_img, (x, y), (x+w, y+h), (0, 255, 0), 2)
                roi_eye=roi_img[y:y+h, x:x+w]
                eyename = 'eye' + str(j)
                j = j+1 
                # cv2.imshow(eyename, roi_eye)
    
            i = i+1
            winname = 'face' + str(i)
            # cv2.imshow(winname, roi_img)
    
        # 将视频帧在窗口中显示
        cv2.imshow('video', img)
    
        key = cv2.waitKey(1) # 此处不能一直等待 0为一直等待
        if (key & 0xFF == ord('q')):
            break;
    
        # mouths = mouth.detectMultiScale(gray, 1.1, 3)
        # for (x,y,w,h) in mouths:
        #     cv2.rectangle(img, (x, y), (x+w, y+h), (255, 0, 0), 2)
    
        # noses = nose.detectMultiScale(gray, 1.1, 3)
        # for (x,y,w,h) in noses:
        #     cv2.rectangle(img, (x, y), (x+w, y+h), (255, 255, 0), 2)
    # 释放VideoCapture
    cap.release()
    
    # 销毁窗口
    cv2.destroyAllWindows();
    

Haar+Tesseract进行车牌识别

  • mac 安装 Tesseract: brew install tesseract tesseract-lang
  • bash操作读取图片:tesseract ***.png rename
  • 车牌预处理包括的内容
    • 对车牌进行二值化处理
    • 进行形态学处理
    • 滤波去噪点
    • 缩放

深度学习基础知识

  • 深度学习是计算机视觉最为重要的方法
  • 深度学习网络模型
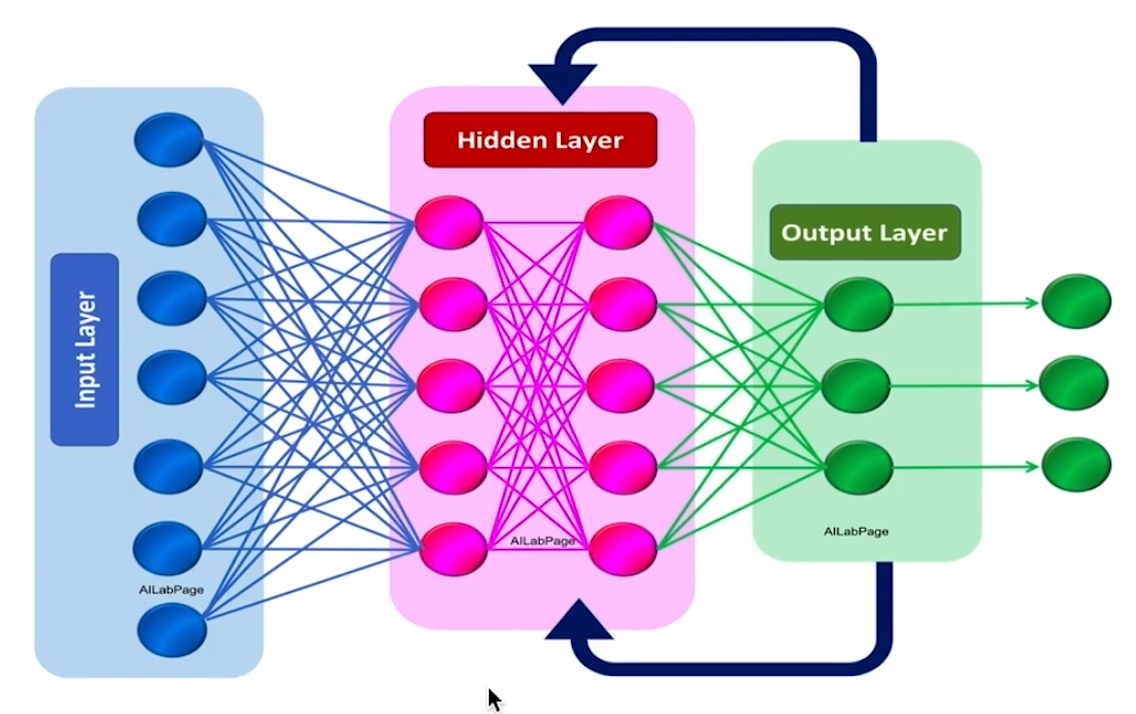
    1. DNN(Deep Neutral Network,深度神经网络)
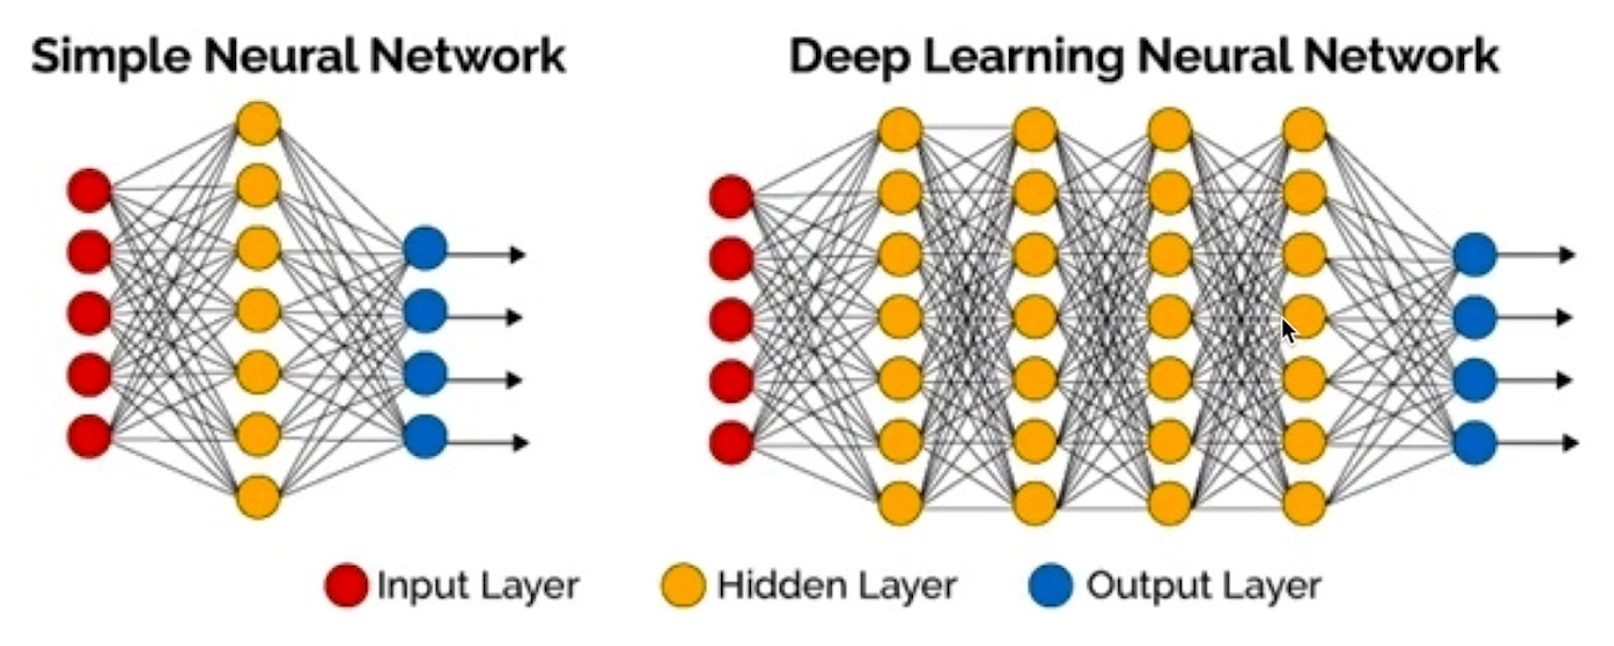
      Image title
      DNN(红色输入层,黄色隐藏层,蓝色输出层)
    2. RNN(Recurrent Neural Network,循环神经网络)
      Image title
      RNN(常用于语音识别,机器翻译,生层图像描述)
    3. CNN(Convolutional Neural Network,卷积神经网络)
      Image title
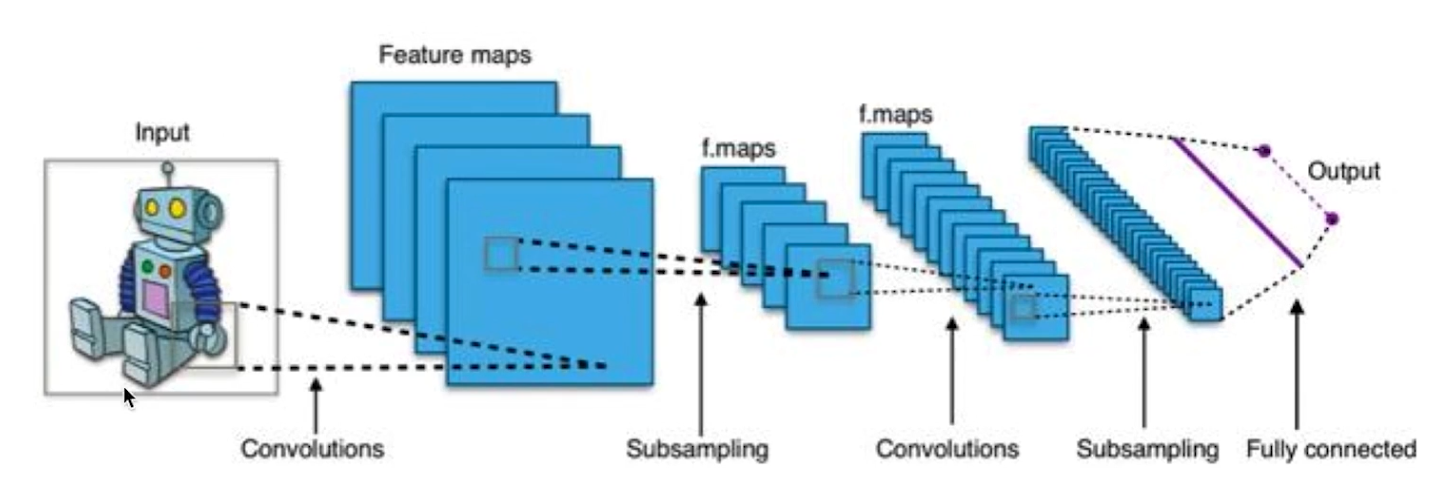
      CNN(对图像卷积,拆分,卷积... 归类特征点,常用于图片分类、检索,目标定位检测,目标分割)
  • 几种CNN网络实现
    1. LeNet,1998年第一代CNN,28x28手写字
    2. AlexNet,2012年ImageNet
    3. VGG、GoogleLeNet、ResNet
      • ResNet:图像错误率识别达到了低于3.6%
  • 几种CNN目标检测网络实现
    1. RCNN、Fast RCNN、Faster RCNN
    2. SSD(Single Shot Detectors)
    3. YOLO、YOLOv2...YOLOv5:该方案是目前速度最快的
  • 深度学习库
    1. TensorFlow Google
    2. caffe—>caffe2->torch(pytorch) 贾扬清
    3. MXNet Apache
  • 训练数据集
    1. MNIST、Fashion-MNIST 手写字体
    2. VOC,举办挑战赛时的数据集,2012年后不再举办(不推荐)
    3. COCO,用于目标检测的大型数据集(推荐)
    4. ImageNet(推荐)
  • 训练模型
    1. TensorFlow训练出的模型是 .pb 文件
    2. Pytorch训练出的模型是 .pth
    3. Caffe训练出的模型是 .caffe
    4. ONNX开放性神经网络交换格式 .onnx(目的是为了统一格式)
  • OpenCV对DNN的支持
    • OpenCV只能使用DNN,不能训练DNN模型
  • OpenCV支持的模型
    • TensorFlow
    • Pytorch/torch
    • Caffe
    • DarkNet:产生的数据模型就是YOLO,目前速度最快的目标检测方式

dnn实现图像分类

  • OpenCV使用DNN
    • 读取模型(TensorFlow、YOLO...),并得到深度神经网络
    • 读取图片 / 视频
    • 将图片转成张量,送入深度神经网络
    • 进行分析,并得到结果
  • OpenCV导入模型
    • readNetFromTensorflow
    • readNetFromCaffe
    • readNetDarknet, YOLO
    • readNet(自动识别模型)
  • 导入模型API参数
    • readNetFromTensorflow(model, config)
    • readNetFromCaffe/Darknet(config, model)
    • readNet(model, [config, [framework]])
  • 如何读取图片并把图像转换成张量
    • blobFromImage函数
    • blobFromImage(image, scalefactor = 1.0, size = Size(), mean = Scalar(), swapRB = false, crop = false)
      1. image: 图片
      2. scalefactor: 缩放因子,默认1.0 不进行缩放
      3. size: 指定图像的大小
      4. mean: 整体像素值减去平均值,是一个RGB的三元组,作用是消除图像中光照的变化,对ImageNet数据集来说,他给定的均值是103、116、123(R, G, B)
        • mean的含义,当左侧图像通过减去均值就会是右侧图像,右侧图就不太受光照的影响了,这样更有利于我们图像的分析。
          Image title
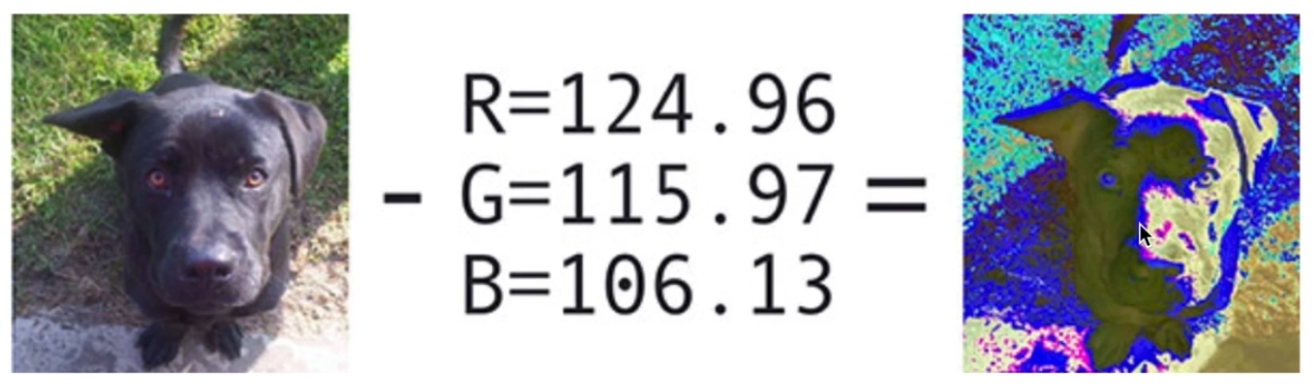
      5. swapRB: RB 是否交换,对于OpenCV来说默认是BGR的,对于深度学习模块来说可能是RGB也可能是BGR,所以这个时候就是R与B是否进行交换。默认情况下是不交换的。
      6. crop: 是否进行裁剪,如果我们输入图像是640 x 480的,但是网络模型要求的是300 x 300的,这个时候我们是否以图像中心为中心对图像进行裁剪,把它超出的部分都裁剪了。默认值是false不进行裁剪。
  • 将张量送入网络并执行
    1. net.setInput(blob): 将我们得到的张量blob塞给网络
    2. net.forward(): 使用网络自动分析
import numpy as np
import argparse
import time
import cv2

# construct the argument parse and parse the arguments
ap = argparse.ArgumentParser()
ap.add_argument("-i", "--image", required=True,
    help="path to input image")
ap.add_argument("-p", "--prototxt", required=True,
    help="path to Caffe 'deploy' prototxt file")
ap.add_argument("-m", "--model", required=True,
    help="path to Caffe pre-trained model")
ap.add_argument("-l", "--labels", required=True,
    help="path to ImageNet labels (i.e., syn-sets)")
args = vars(ap.parse_args())

# load the input image from disk
image = cv2.imread(args["image"])
# load the class labels from disk
# rows = open(args["labels"]).read().strip().split("\n")
# classes = [r[r.find(" ") + 1:].split(",")[0] for r in rows]

# our CNN requires fixed spatial dimensions for our input image(s)
# so we need to ensure it is resized to 224x224 pixels while
# performing mean subtraction (104, 117, 123) to normalize the input;
# after executing this command our "blob" now has the shape:
# (1, 3, 224, 224)
blob = cv2.dnn.blobFromImage(image, 1, (224, 224), (104, 117, 123))

# load our serialized model from disk
print("[INFO] loading model...")
net = cv2.dnn.readNetFromCaffe(args["prototxt"], args["model"])

# set the blob as input to the network and perform a forward-pass to
# obtain our output classification
net.setInput(blob)
start = time.time()
preds = net.forward()
end = time.time()
print("[INFO] classification took {:.5} seconds".format(end - start))

# sort the indexes of the probabilities in descending order (higher
# probabilitiy first) and grab the top-5 predictions
idxs = np.argsort(preds[0])[::-1][:5]

# loop over the top-5 predictions and display them
for (i, idx) in enumerate(idxs):
    # draw the top prediction on the input image
    if i == 0:
        text = "Label: {}, {:.2f}%".format(classes[idx],
            preds[0][idx] * 100)
        cv2.putText(image, text, (5, 25),  cv2.FONT_HERSHEY_SIMPLEX,
            0.7, (0, 0, 255), 2)
    # display the predicted label + associated probability to the
    # console   
    print("[INFO] {}. label: {}, probability: {:.5}".format(i + 1,
        classes[idx], preds[0][idx]))
# display the output image
cv2.imshow("Image", image)
cv2.waitKey(0)